Unreal SDK
The Immutable SDK for Unreal helps you integrate your game with Immutable Passport.
- Windows (64-bit)
- macOS (minimum version 10.5)
- Android (minimum version 8.0)
- iOS (minimum version 13.0)
- Unreal Engine 5.2 or newer for Windows, Android, macOS and iOS
- Unreal Engine 5.0 or newer for Windows and Android
- Unreal Engine 4.26 or newer for Windows
Registering your game
Before using Passport, you must register your application as an OAuth 2.0 Native client in the Immutable Developer Hub. First, you'll need to create a project and a testnet environment. Then, you can navigate to the Passport config screen and create a passport client for your created environment. When you're ready to launch your application on the mainnet, please ensure you configure a passport client under a mainnet environment. Here's how you can configure the fields while creating a client:
Creating an OAuth2.0 Native client
Application Type
This field is required.
You must register your application as an OAuth 2.0 Native client.
Client name
This field is required.
The name you wish to use to identify your application.
Logout URLs
This field is required.
If you wish to use PKCE login on Android, iOS and macOS clients, you must set your application's logout deep link (e.g. mygame://logout). The deep link for Logout URLs must differ from Redirect URLs. Otherwise, use your website, https://localhost:3000 or set it to be the same as Redirect URLs.
Redirect URLs
On Android, iOS and macOS clients, you should set your application's deep link scheme (e.g. mygame://callback) if you wish to make use of PKCE login, otherwise set the same as Logout URLs.
PKCE login is not supported on Windows clients. Hence, they do not use Redirect URLs. You may set Redirect URLs to be the same as Logout URLs, as it is a required field.
Web Origins URLs
- For Unreal Engine 5.0 and above you may leave it blank.
- For Unreal Engine versions between 4.26 and 5.0. Add
file://to the list of Web Origins URLs. This is required to work with Blui browser.
See here for more details.
Installation
- Since
.uassetand.umapfiles are stored on Git Large File Storage, you must download and install git-lfs from here before cloning the respository - Clone the unreal-immutable-sdk repository or download the zip/tarball from one of the versions here
- Copy the cloned repo into your project's
Pluginsfolder, e.g.:MyGame/Plugins/unreal-immutable-sdk - Restart your project (Unreal Editor & Jetbrains Rider IDE), upon restart it should load the
unreal-sdk-pluginand should be good to use
immutable.uplugin -> Plugins -> WebBrowserWidget to false and restart your UE4 editor. For Unreal Engine 5.0 and above, we use the inbuilt browser.Setup
Blueprint
See the included sample widgets in All->Plugins->Immutable Content in the Unreal Editor content browser for examples of how to use the plugin in Blueprint. If you don't see a Plugins folder under All you may need to enable Show Plugin Content in the content browser's Settings menu.
C++
Check out the ImmutablePassport.h file for the C++ Passport API. In order to know the list of methods to call for the Passport Login Flow and the Passport Log out Flow, follow the same sequence of steps as the Blueprint widget examples below.
Quick Start
Log into Passport
To log the gamer into Passport
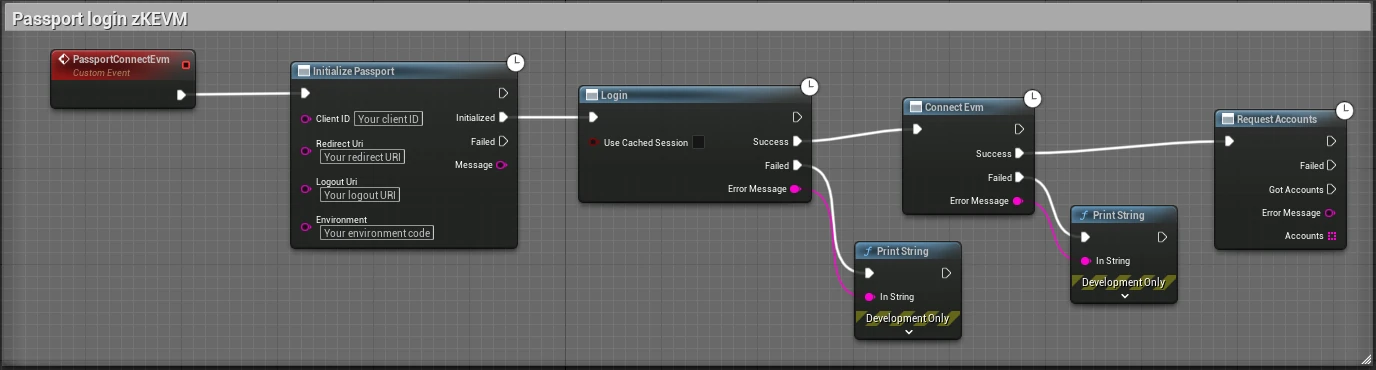
Loginblueprint node has to be called. This will open the gamer's default browser and take them through the auth flow.- Then, in order to interact with Immutable zkEVM, you will need to instantiate the Passport's zkEVM provider via
ConnectEvm. - Call
ZkEvmRequestAccountsblueprint node to initialise the gamer's wallet.
ZkEvmRequestAccounts is called.Once the gamer is connected to Passport, the SDK will store your credentials (access, ID, and refresh tokens). If assign useCachedSession to true, while using Login blueprint node, stored credentials will be used to relogin the gamer. If relogin fails, it will fall back to Device Code Authorisation.
environment argument can be one of the following:| Environment | Description |
|---|---|
| sandbox | The default test network (currently, it is Sepolia) |
| production | The Ethereum mainnet network |
The RedirectUri and LogoutUri fields are not required for the Device Code Authorisation flow and can be left empty however they are required for PKCE login flow
Log out of Passport
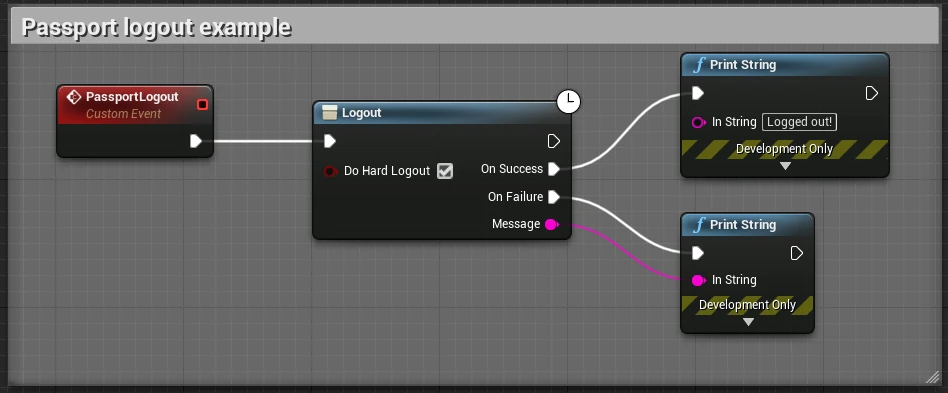
To initiate the logout process in Passport, utilise the Logout node demonstrated below. Two logout options are available:
- Hard Logout: This option clears sessions from both the SDK (local) and the browser used for login. The SDK will open a browser to clear the browser session during the logout process.
- Soft Logout: If there is a desire to bypass opening the browser during the logout process, set the
DoHardLogoutparameter tofalse. This will perform only a local logout, and gamers will remain logged in to Passport in the browser until the session expires.
Android, iOS and macOS PKCE login
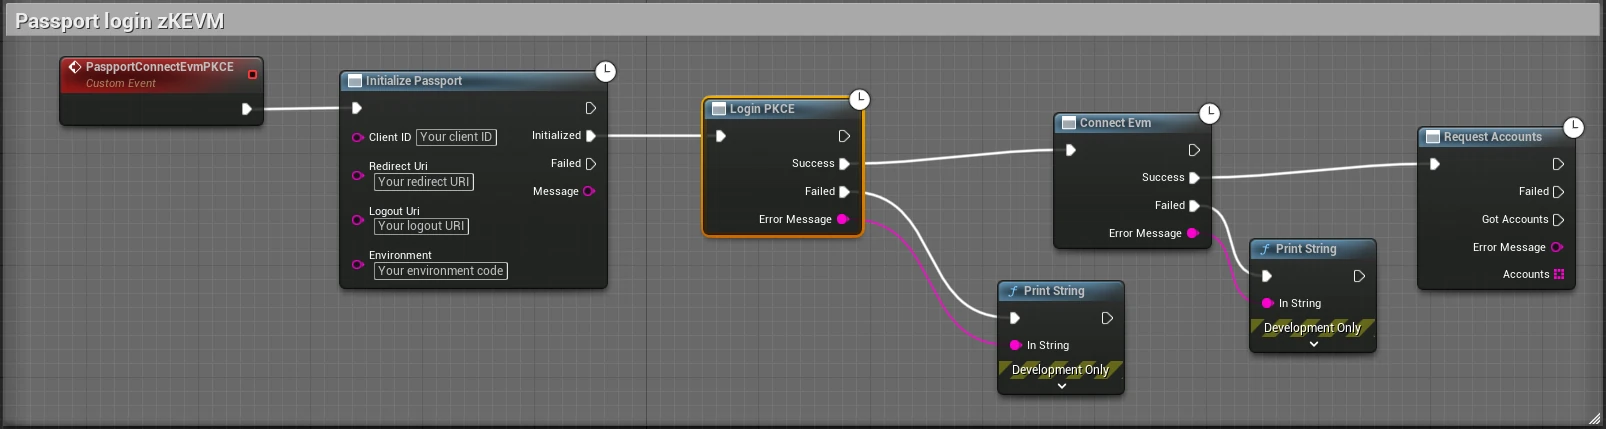
ZkEvmRequestAccounts is called.For Android, iOS and macOS, you can use the Authorization Code Flow with Proof Key for Code Exchange (PKCE) login flow instead of Device Code Authorisation. This means the gamer has one less step to complete and will be redirected back to the game after successfully authenticating.
To use this flow you will need to:
- Define a deep link scheme for your game (e.g.
mygame://callbackfor logging in andmygame://callback/logoutfor logging out) - Login to the Immutable Developer Hub and add the deep links to your clients Redirect URLs and Logout URLs
- Set this deep links as your redirect URI and logout redirect URI in the Passport Initialise
- Call
LoginPKCEinstead ofLogin
Unreal Editor Android setup
- Create an Unreal Plugin Language XML file (e.g.
Source/MyGame/MyGame_UPL_Android.xml) and add the following code:
<?xml version="1.0" encoding="utf-8"?>
<root xmlns:android="http://schemas.android.com/apk/res/android">
    <androidManifestUpdates>
        <addElements tag="application">
            <activity
                    android:name="com.immutable.unreal.RedirectActivity"
                    android:exported="true" >
                <intent-filter android:autoVerify="true">
                    <action android:name="android.intent.action.VIEW" />
                    <category android:name="android.intent.category.DEFAULT" />
                    <category android:name="android.intent.category.BROWSABLE" />
                    <data android:host="callback" android:scheme="mygame" />
                    <data android:host="logout" android:scheme="mygame" />
                </intent-filter>
            </activity>
        </addElements>
    </androidManifestUpdates>
</root>
- Open your game's build file (e.g.
Source/MyGame/MyGame.Build.cs) and add:
if (Target.Platform == UnrealTargetPlatform.Android)
{
  string MyPath = Utils.MakePathRelativeTo(ModuleDirectory, Target.RelativeEnginePath);
  AdditionalPropertiesForReceipt.Add("AndroidPlugin", Path.Combine(MyPath, "MyGame_UPL_Android.xml"));
}
Your game will now open when the device processes any link that starts with mygame://callback or mygame://logout.
Unreal Editor iOS setup
- In Unreal Editor go to Project Settings -> iOS -> Extra PList Data
- Add the following code inside the Additional Plist Data field:
<key>CFBundleURLTypes</key><array><dict><key>CFBundleURLSchemes</key><array><string>mygame</string></array></dict></array>
After this set-up and the redirect URI you set in Initialize Passport, your game can log in using mygame://callback.
Unreal Editor macOS setup
Since there is no way to add extra plist data like iOS from the Unreal Editor Project Settings, you will need to edit the Engine's default Info.plist.
- In your preferred IDE, open the engine's
Info.plistfile (e.g.Engine/Source/Runtime/Launch/Resources/Mac/Info.plist) - Add the following code inside the root
<dict>...</dict>:
<key>CFBundleURLTypes</key>
<array>
    <dict>
        <key>CFBundleURLSchemes</key>
        <array>
            <string>mygame</string>
        </array>
    </dict>
</array>
After setting up and specifying the redirect URI in Initialize Passport, the user will be automatically redirected back to the game through mygame://callback upon completing the login process.
See the sample game for an example of how to set up PKCE for Android, iOS and macOS.
zkEVM Send Transaction
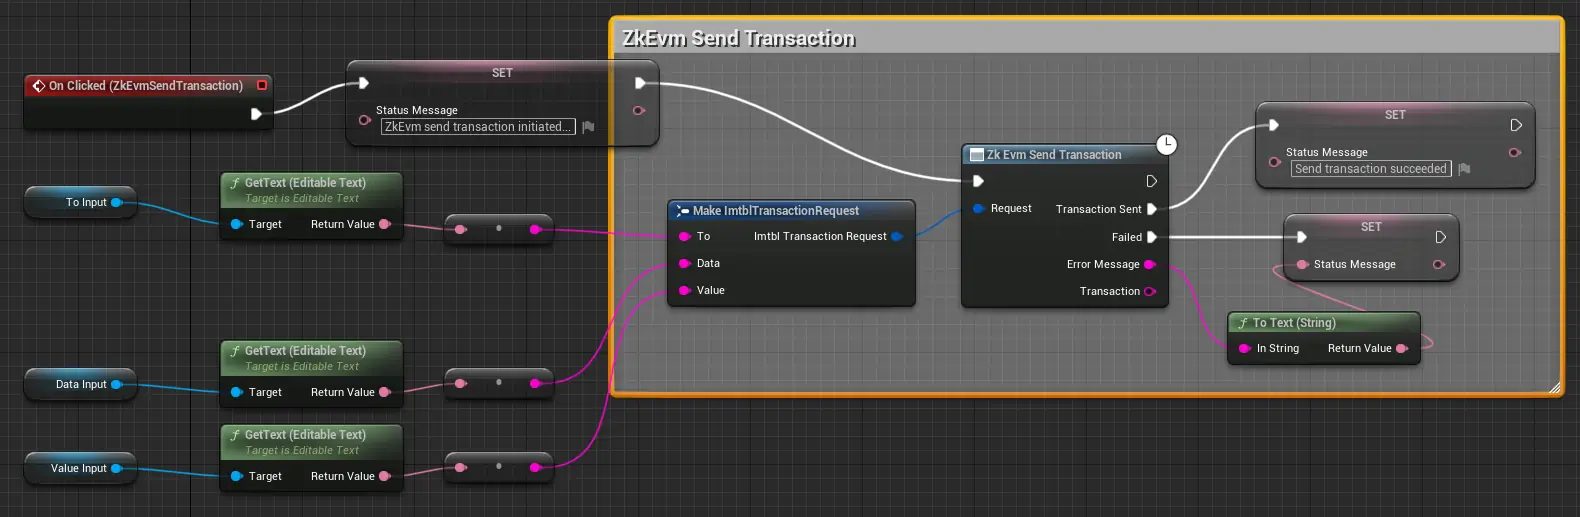
- The zkEVM send transaction requires pre-approval from Immutable. Please contact us before making use of it.
- Must have first called `ConnectEvm` to set up the zkEVM provider and `ZkEvmRequestAccounts` to login the user.
To send a transaction on zkEVM use UImmutablePassport::ZkEvmSendTransaction method. See this Blueprint example showing how to use Zk Evm Send Transaction.
See here for more details.
Supported Functionality
| Method | Description |
|---|---|
InitializePassport | Initialises Passport |
Login | Log into Passport using Device Code Authorisation. If useCachedSession is true, stored credentials will be used to re-login the gamer. If re-login fails, it will fall back to Device Code Authorisation. |
LoginPKCE | (Android, iOS and macOS only) Log into Passport using Authorization Code Flow with Proof Key for Code Exchange (PKCE) |
Logout | Log out Passport |
HasStoredCredentials | Check if there are stored credits from the previous login |
GetEmail | Get the email address associated with the wallet address |
GetAccessToken | Get Passport user's access token |
GetIdToken | Get Passport user's ID token |
ConnectEvm | Initialise the zkEVM provider |
ZkEvmRequestAccounts | Attempt to authenticate the user and initialise their Passport wallet before returning an array of wallet addresses |
ZkEvmGetBalance | Get the balance of the given address in wei |
ZkEvmSendTransaction | Create a new message call transaction or a contract creation if the data field contains code |
Examples
- Sample Blueprints - see the sample blueprints for examples of how to use the Immutable Unreal SDK.
- Sample Game - see the sample game for an example of how to use the Immutable Unreal SDK.
Further documentation
- See the Developer homepage for general information on building on Immutable.
- Build on Immutable zkEVM:
- Build on Immutable X: